


Free Crochet Pattern
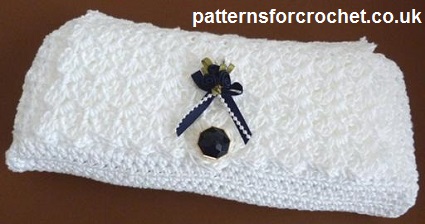
Clutch Bag
UK -
Abbreviations
WS. Wrong Side
RS. Right Side
st. Stitch
ss. Slip Stitch
dc. Double Crochet
htr. Half Treble Crochet
rpt. Repeat
Dec. Leaving last loop of each dc
on hook, yrh, pull through all loops.
Base of ch. Work into first stitch
2ch counts as first htr
3ch counts as first tr
Approx size: 10” width x 5” high
Materials
100 grams of 100% Cotton Double Knitting Yarn
5.00mm crochet hook, Decorative Button and Ribbon Rosebud
TENSION -
**************************************************
Clutch Bag -
each ch to end. Turn (37htr + 2ch)
Next Row -
Front Flap -
Next Row -
(10, groups)
Pattern Row -
Rpt Pattern Row 11 more times making 13 Pattern Rows in all. Fasten off.
Bag Edging and Sides -
into last row end (44dc), 3dc into corner, working along starting ch, work 1dc into
each of next 36ch to corner, 3dc into corner, working up the second side of bag and
into row ends, work 2dc into next row end, rpt from * to * to base of flap, (44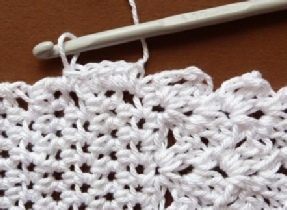 dc).
Turn.
dc).
Turn.
Side Panels -
into base of 1ch, 1dc into each of next 19dc, dec 1dc over next 2dc, (see abbrev above) 1dc into each of next 2dc, dec 1dc over next 2dc, 1dc into each of next 20dc. Turn. (44dc)
Next Row -
1dc into each of next 19dc, dec 1dc over next 2dc, (twice), 1dc into each of next 20dc.
Turn. (42dc)
Next Row -
Next Row -
Make 1ch, using centre loops of dc, ss both sides of each dc together to close.
Fasten off. #
Starting on short side on opposite corner (see pic below) with RS facing, Rpt from # to
# the same as the first side. Fasten off.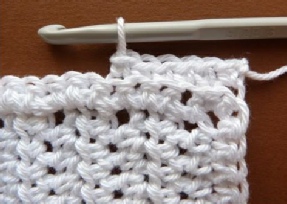
Finishing -
Hope you enjoy it.
All Rights Reserved copyright © 2014 patternsforcrochet.co.uk
PFC91
Please do not re-
If you do make and sell the finished items from any of my FREE patterns
please give credit to patternsforcrochet as the designer and
put a link back to this website.
Thanking you Heather
See more:-
Patterns for crochet -
Patterns for crochet -
Patterns for crochet -
Patterns for crochet -
All Patterns on this website are © Copyrighted to patternsforcrochet.co.uk
| Blankets |
| Apparel |
| Baby Footwear |
| Bibs |
| Hats |
| Shawls |
| Stroller & Pram |
| Coats & Tops |
| Baby Dresses |
| Bonnets and Beanies |
| Headbands |
| Kitchen/Dining |
| Bathroom |
| Doilies & Mats |
| Placemats & Coasters |
| Tea Towels & Dishcloths |
| Christmas Designs |
| Motifs |
| Classes & Yarn |
| Crochet Stitches |
| Hats & Scarves |
| Cowls |
| Bags |
| Purses & Covers |
| Children's |